Setting Up Your Redis-Powered Caching Mechanism in Your Node.js Project — Part 01
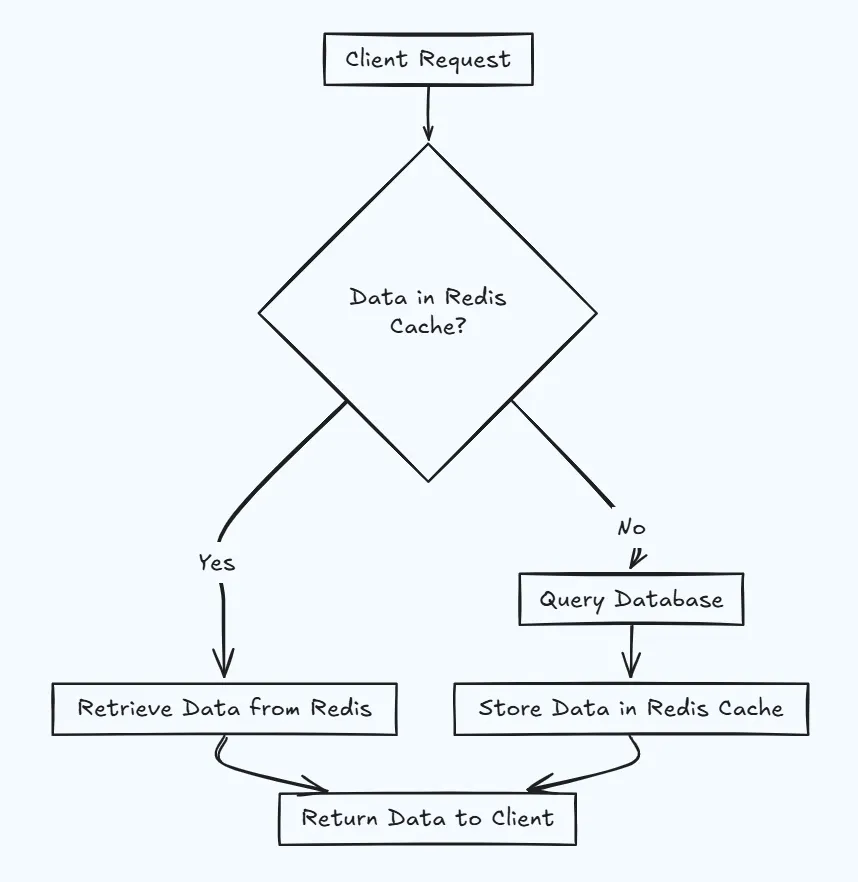
Caching is an important concept as we work in backend systems, and it is very important to set up a unique and consistent caching mechanism for any kind of application. In this article, we are going to learn how to set up caching in your application using Redis.
Since I am going to do everything from scratch, it may be very long to follow in a single article. So, I will be doing this in multiple parts. Let’s get started.
Prerequisites
- Basic understanding of Node.js and the Express framework
Hey there! It’s my first time writing an article on Medium, and I am getting my hands dirty in backend development with Node.js and Express.js. So, today we’ll cover an important concept in Node.js: Caching using Redis.
Today, we’ll be covering not only the basics but also a very effective and consistent caching mechanism that we can implement in our project.
Before diving directly into our code, let’s understand some terminology that we’ll be using throughout the tutorial.
Cache and Caching
If we are a little bit familiar with computer memory, then we must have heard about Cache Memory.
In simple terms, cache is data or information that is stored inside the cache memory. It is fast and easy to access by the computer’s processor rather than fetching it from the main memory (RAM).
In the same way, we can use cache memory to store frequently requested data and static content, rather than querying the database every time. This helps optimize our queries to the database and saves time.
Just like cache memory in our computer, Redis provides us with a platform to store data as a cache.
The overall process of fetching and storing data in cache memory is called caching.
Why Do We Need Caching?
Caching can come in very handy for the following reasons:
- Serving repeated requests from the cache saves time and resources for other tasks.
- This way, we can handle more concurrent users by reducing the load on database servers.
- Faster response times make the application feel smoother.
Well, there are many useful cases for using caching. Let’s not talk much about it for now. You’ll get to know its uses as we move on.
What Is Redis and How Does It Work?
Redis is an open-source, in-memory data structure store often used as a database, cache, and message broker. It can store data in various data types like strings, hashes, sets, and so on.
It stores data in key-value pairs:
{
  "myKey": "some value to the key"
}
So, now that we have cleared up some concepts about what we are trying to do, let’s get to our main topic.
Installing Redis and Node.js
I am expecting that you have already installed Node.js on your machine. If you haven’t, then you can install the latest version from the official Node.js website.
If you have already installed Node.js, then update it to the latest version using:
# Verify the Node.js version
node -v

# Install NVM (Node Version Manager) if you need to manage Node.js versions

nvm install <version>
nvm use <version> # Switch to the newer version
You can install Redis by going to the official Redis documentation to get redis-cli.
The current version of Redis is only supported on Linux and macOS but not on Windows OS. So, if you are using Windows, then you need to have WSL2 installed on your machine.
You can follow the tutorial provided there for other operating systems. Here’s how you can install Redis on a Windows machine.
1. Install WSL on Your Machine
Open PowerShell or Windows Command Prompt in administrator mode by right-clicking and selecting "Run as administrator".
Then enter:
wsl --install
This installs Ubuntu as the default distribution.
You can then use the Ubuntu terminal from Windows.
If you are using an older Windows build, here’s the detailed information about installing WSL.
2. Install Redis in WSL
Once you’re running Ubuntu on Windows, to install recent stable versions of Redis from the official packages, run the following commands:
curl -fsSL https://packages.redis.io/gpg | sudo gpg --dearmor -o /usr/share/keyrings/redis-archive-keyring.gpg

echo "deb [signed-by=/usr/share/keyrings/redis-archive-keyring.gpg] https://packages.redis.io/deb $(lsb_release -cs) main" | sudo tee /etc/apt/sources.list.d/redis.list

sudo apt-get update
sudo apt-get install redis
Now start the Redis server using:
sudo service redis-server start
This may ask for your password.
Enter the password that you set while installing your Linux distribution.
3. Connect to Redis CLI
Once Redis is running, you can test it by running:
redis-cli
Test the connection using:
PING
Now everything we need is installed. Let’s jump into our coding section.
Choosing a Redis Client for Node.js
One more important thing before we get started: for Node.js, there are two popular Redis clients: ioredis and node_redis.
Here, we will use node_redis for this course, which is a modern, high-performance Redis client for Node.js.
Installing Redis
To install Redis in your project, simply run:
npm i redis
One more thing: since we are trying to set up caching for slightly more complex projects, here I will give an overview of the folder structure of our application and explain the caching mechanism.
Don’t worry about the Redis commands and syntax. I’ll explain everything along the way. If you really want to deep dive into the syntax, then you can see the Redis npm package documentation.
Project Folder Structure
Let’s start with the folder structure we will have for our application.
Here, I will be using a Blog Posting Application as a reference to set up the caching mechanism. Don’t worry; I will teach you in a way that you can easily get an idea of how you can use it in any application.
Folder Structure
blog-app/
├── public/                 # Static files (images, CSS, client-side JS)
│   ├── images/
│   ├── css/
│   └── js/
├── src/
│   ├── config/
│   ├── routes/
│   │   ├── auth.js        # Authentication routes
│   │   └── blog.js        # Blog-related routes
│   ├── controllers/       # Route handlers (business logic)
│   ├── models/
│   ├── services/
│   │   ├── authService.js
│   │   └── cache.js       # Main logic for caching
│   ├── middlewares/
│   │   ├── authMiddleware.js
│   │   └── clearHash.js
│   └── app.js
└── .env
It doesn’t matter how you set up your folder structure; what matters is the concept. So, we’ll focus more on that.
What’s Next?
Till now, we have set up our project and installed everything we’ll be using later on.
In the next part, we’ll start the actual coding section.
Hope you like it.
Make sure to follow and leave a comment behind about how you feel about the content.
Thanks for reading!